
While I acknowledge the expectations Ellis tries to set, all the youtubers out there have me chasing a dragon looking for better and better layer aliment on my z-axis. I suspect (at least) one of you will come out of the woodwork and say your printer has better aligned layers than mine too 😭 I’m certainly not alone, but even in that thread you can find some people claiming that not everyone experiences the issue
So far, I’ve been through three iterations on my CW2:
- BMG gears with a grub screw
- BMG Integrated Drive Gear Assembly (IDGA). Press fit gear = no more grub screw
- FYSETC CNC Pom w/ Helical gears, since evidently the BMG gears can still be somewhat offset
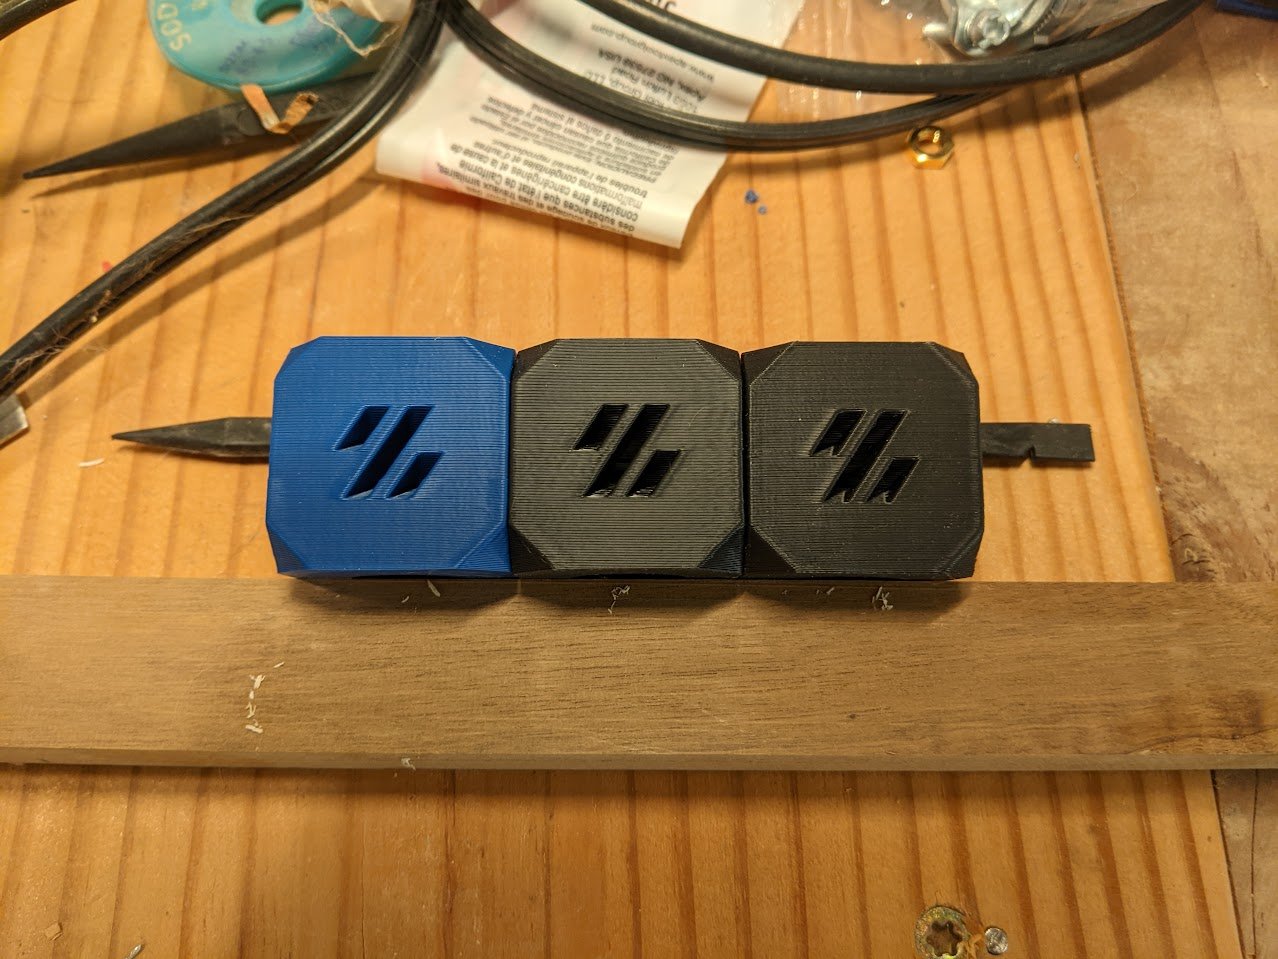
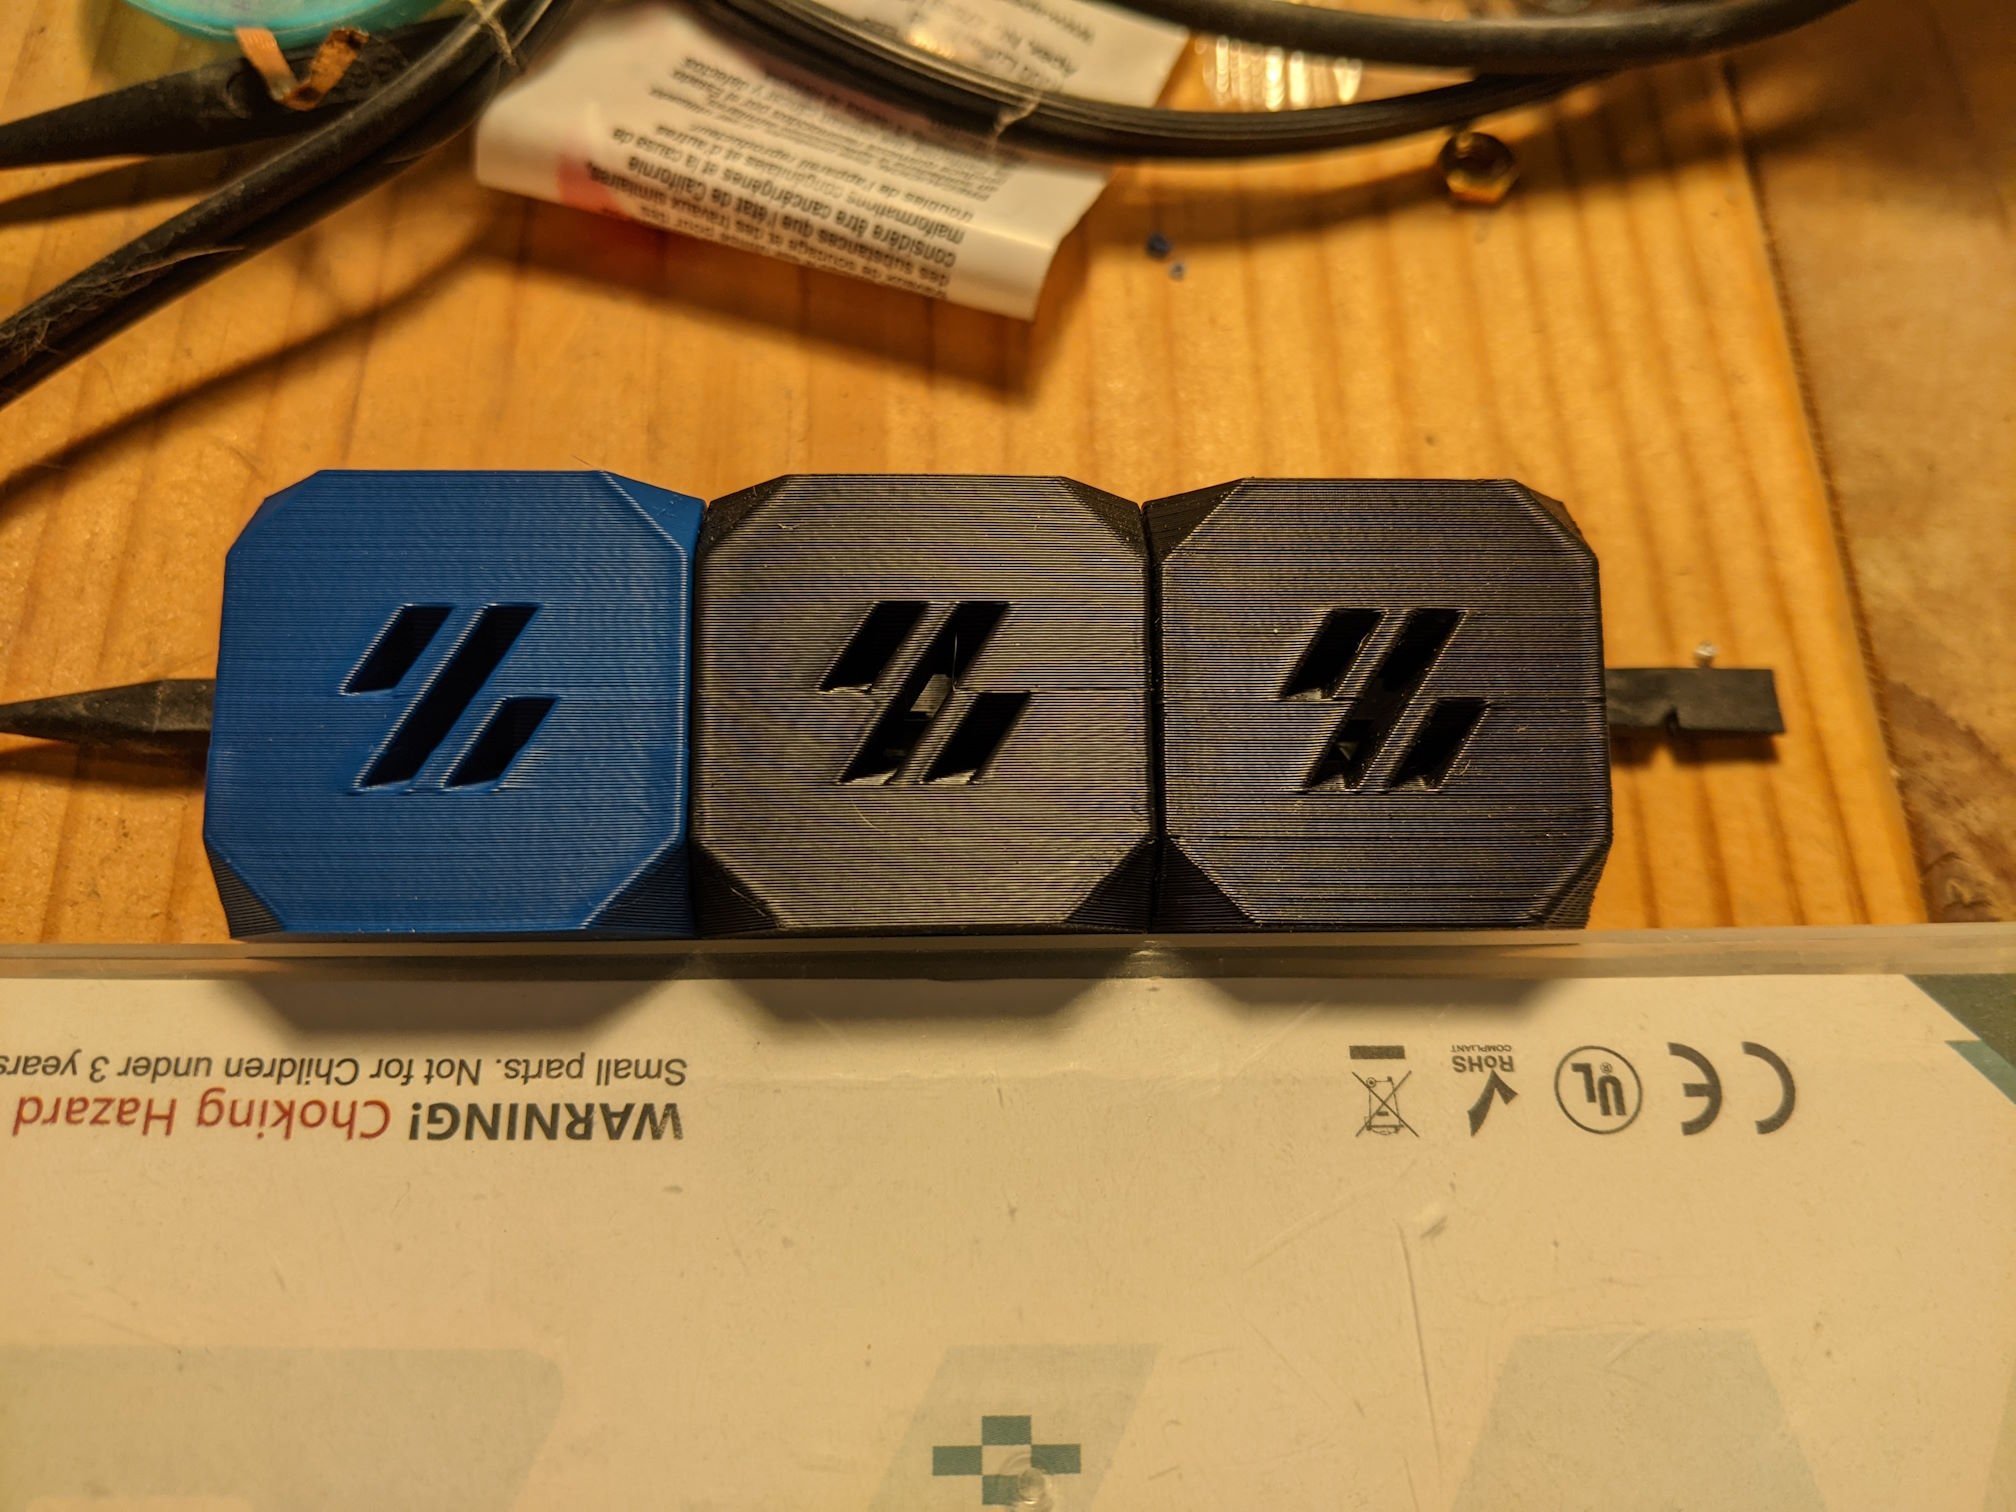
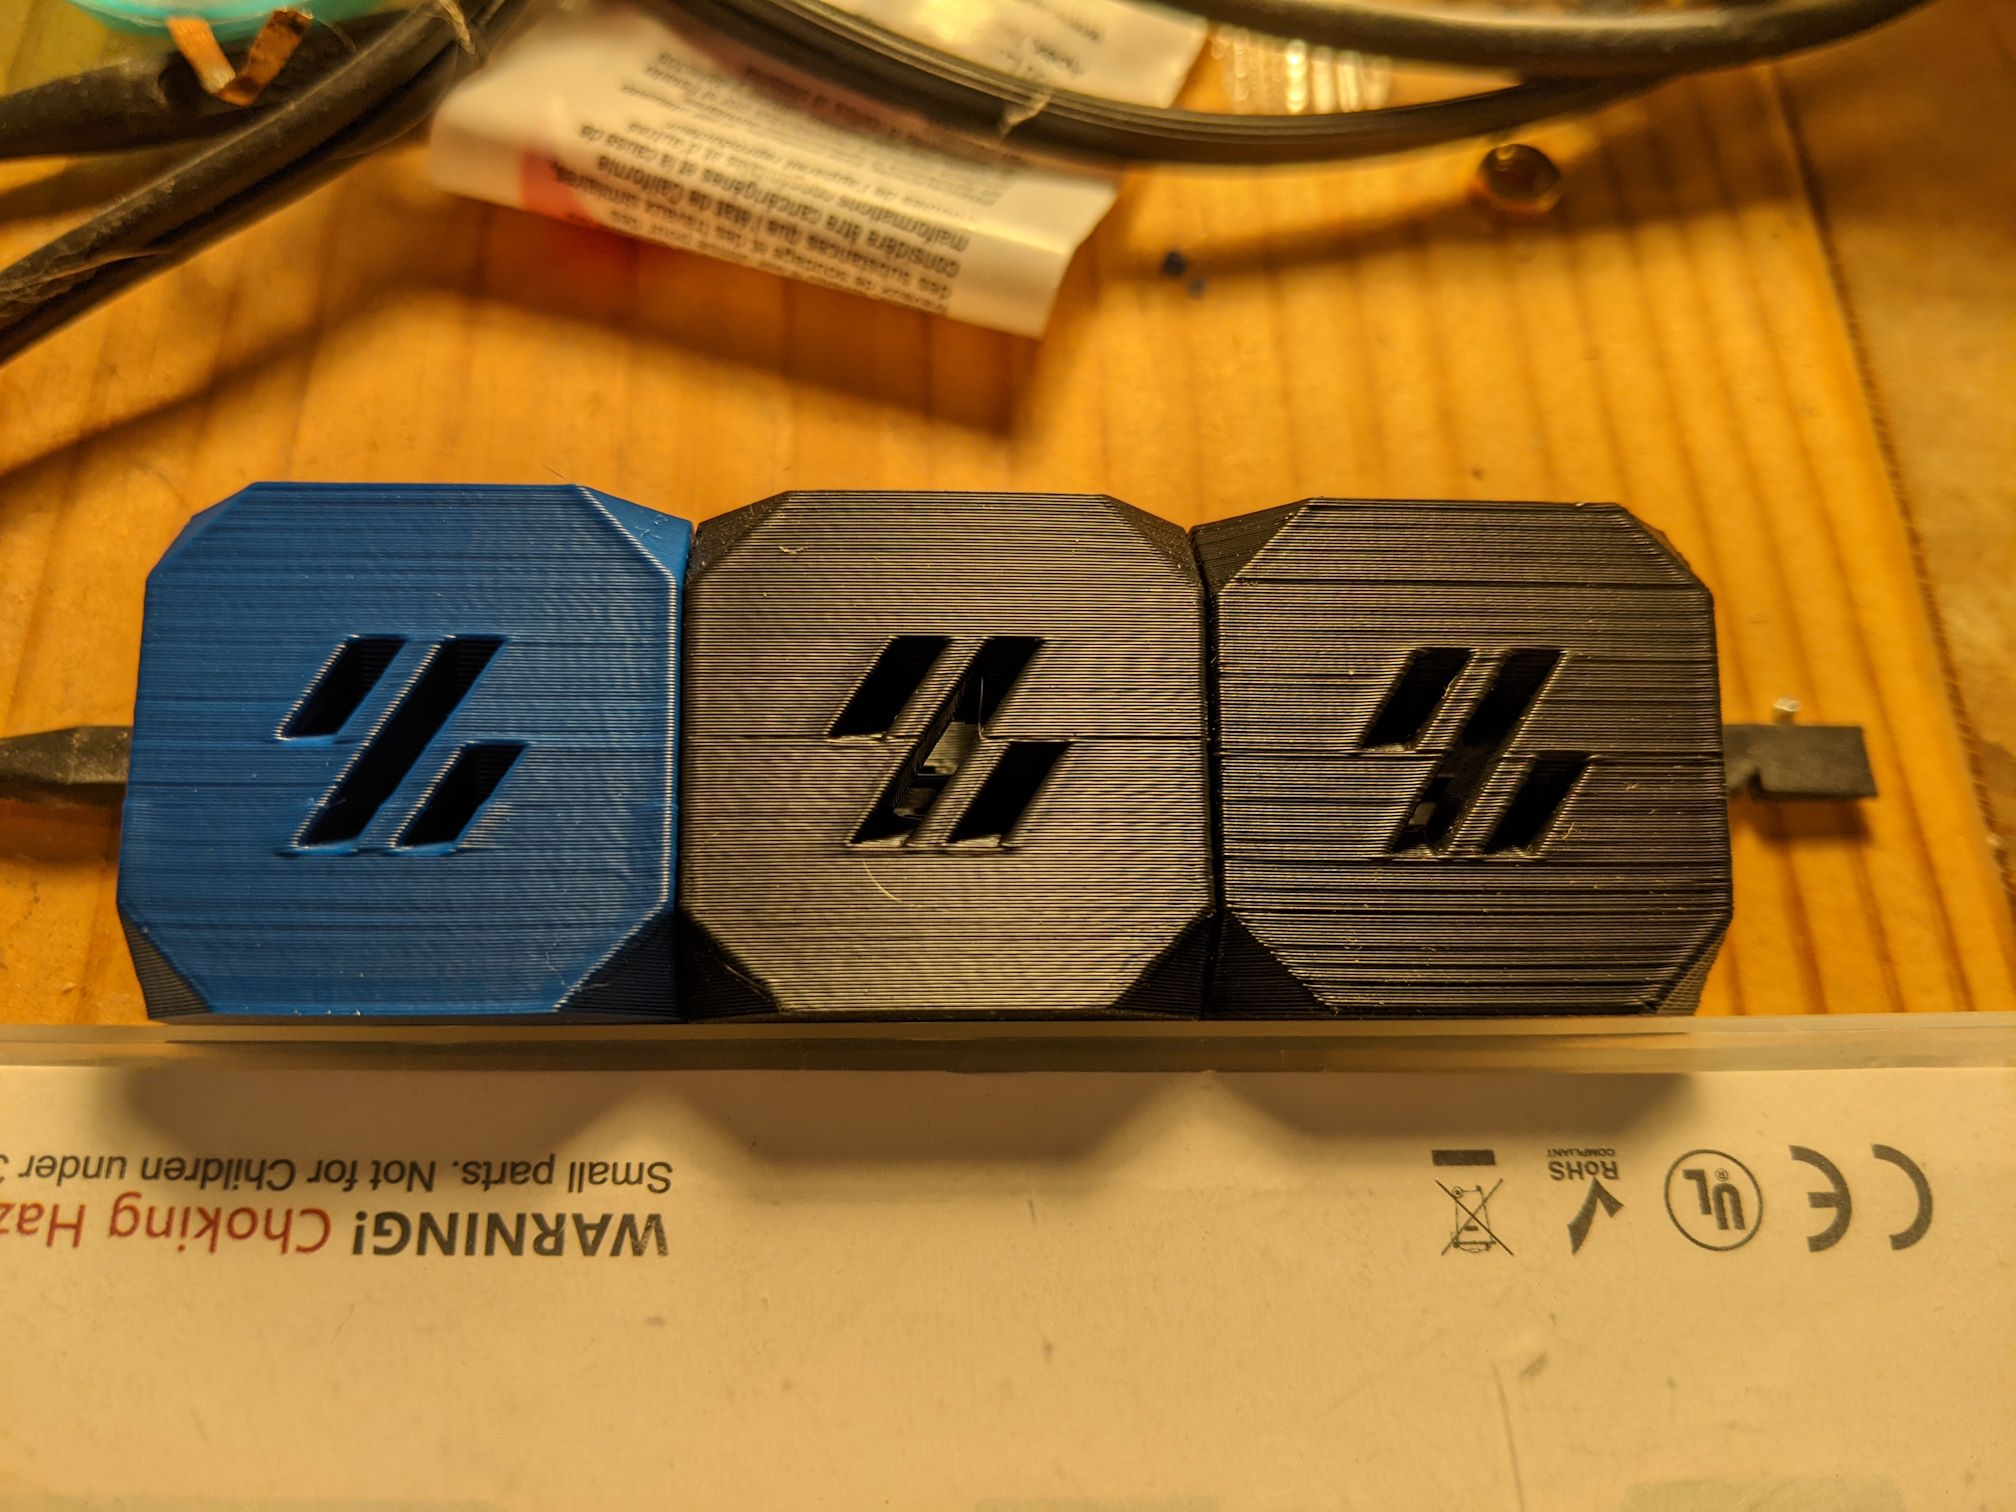
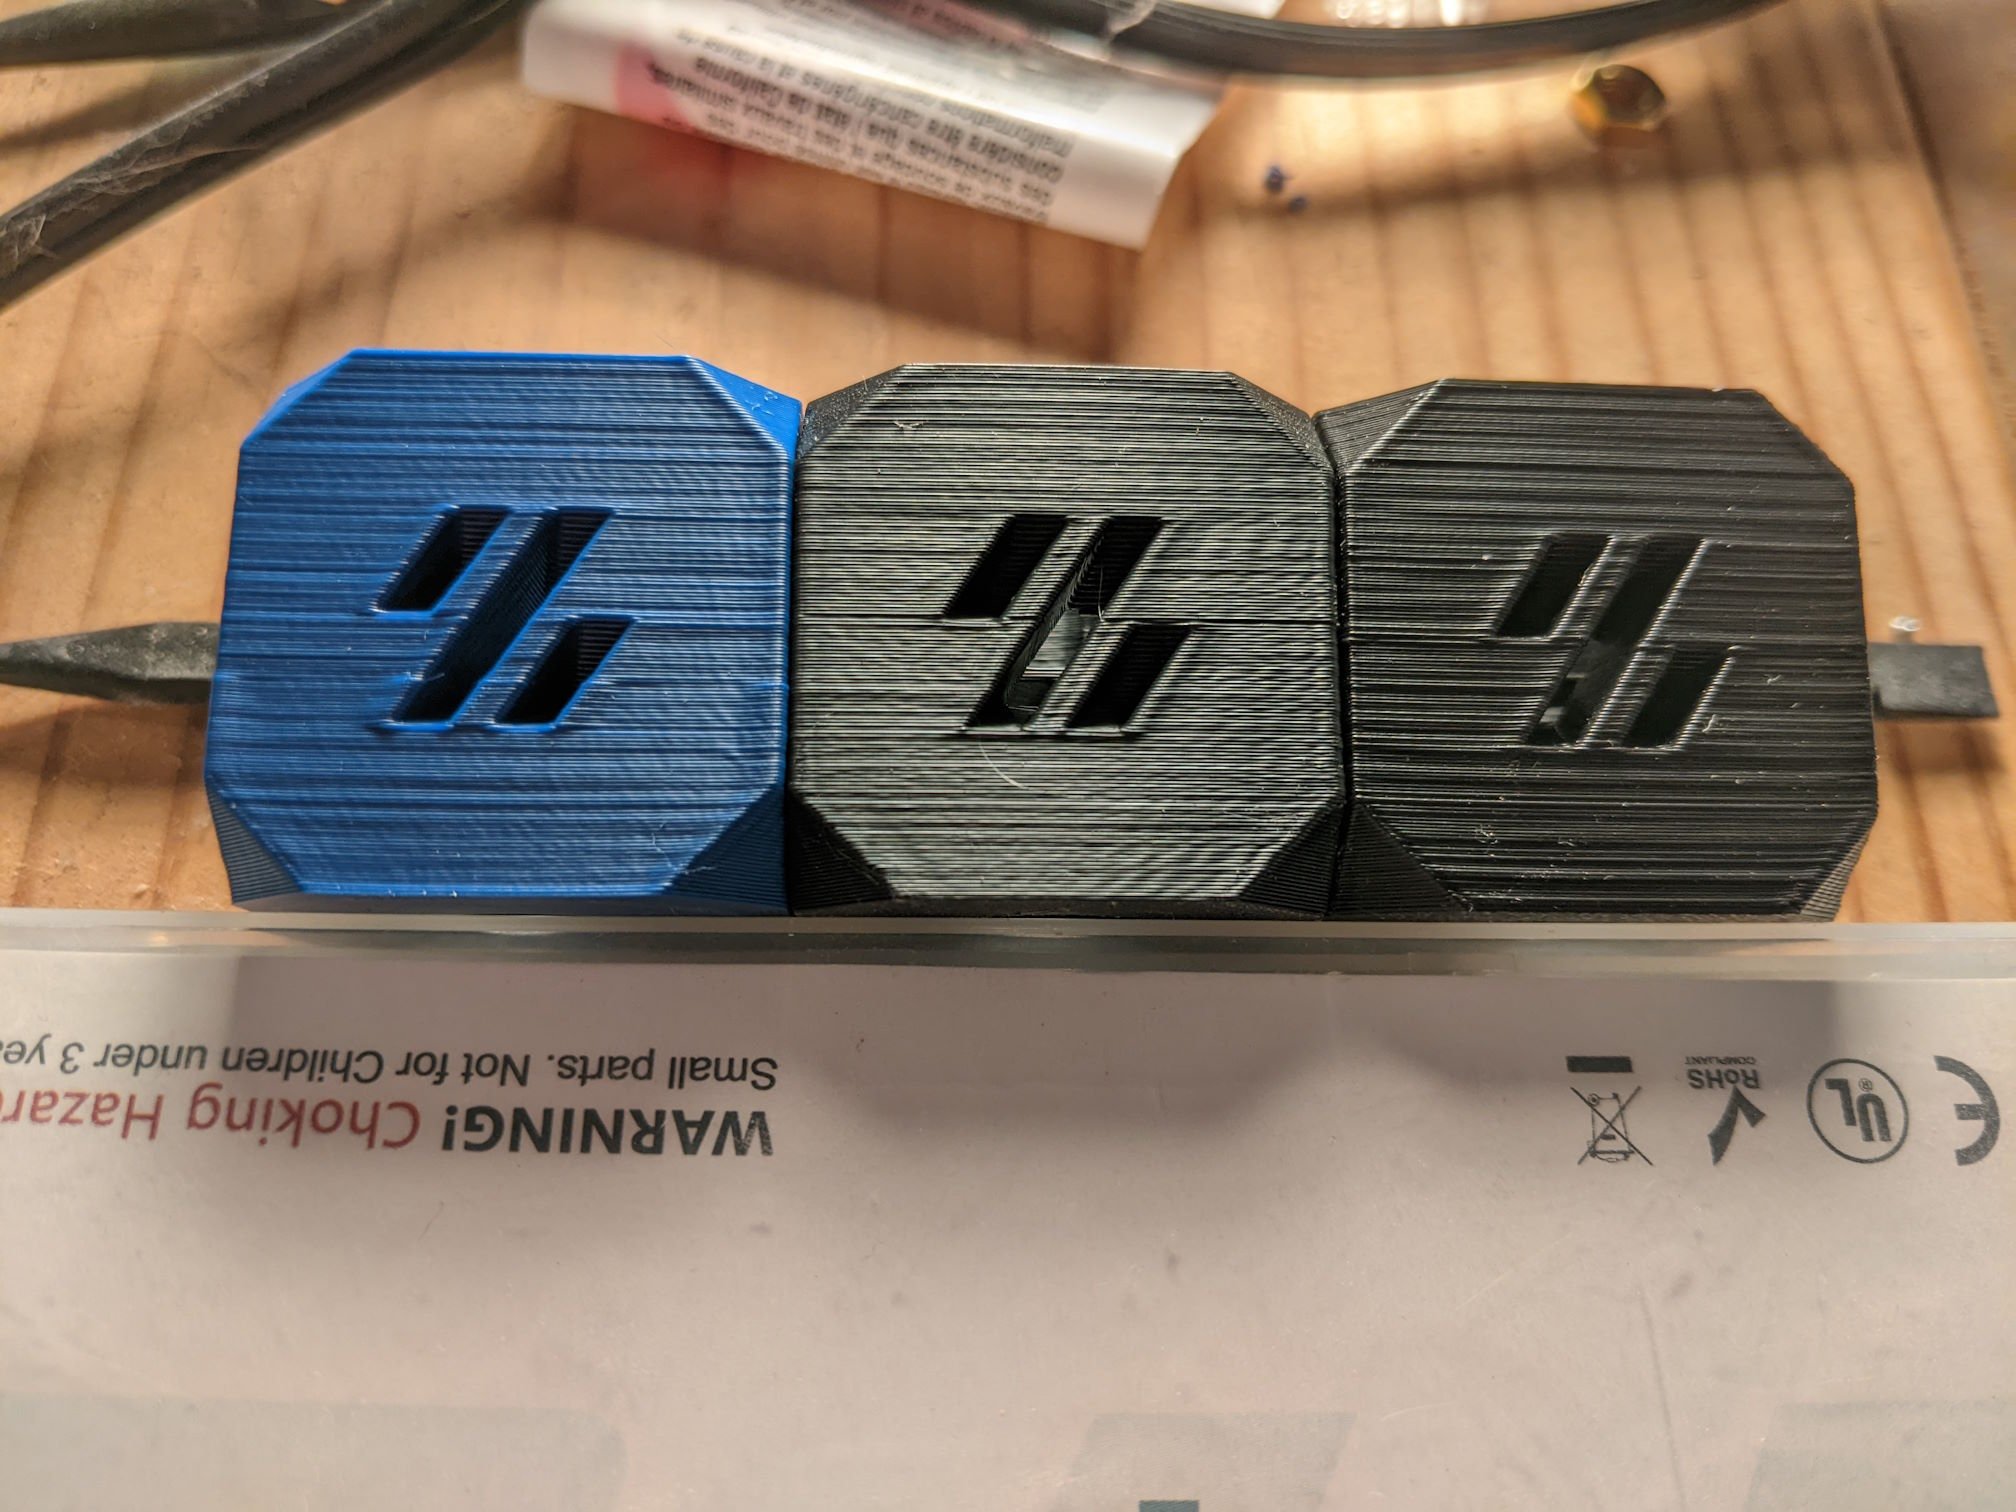
Results below with me hand holding my cellphone and moving a Pixar style desk lamp to be at a progressively steeper angle to the face of the cubes. Left = FYSTEC Pom (I also used Orcaslicer), middle = BMG IDGA, right = ‘normal’ BMGs. Note that the cubes are upside down.
Vanity shot with very soft and indirect light
Direct light, 90 degrees to the face of the cubes (basically perpendicular)
Direct light, ~45 degrees to the face of the cubes
Direct light, ~5 degrees to the face of the cubes (basically parallel)
At this point, I am going to shrug, give up, and print with fuzz (or avoid harsh light).
That’s pretty rough. A bone stock Ender 3 does better than that.
This makes me sad. The center and left cube are pretty solid in person until you get direct overhead light on them.
I just added another photo to the OP with a more diffused light sourced. It makes all three parts look pretty good.
I do kind of wonder if this is a compromised based on speed. I wouldn’t say I’m going fast, but I am running 110 perimeters and 3k accelerations. Maybe I should print a slower cube.
Other ideas are welcome :)
It may be a trick of the lighting. The picture you added looks much better. But I wouldn’t think you would be able to see that kind of errors just from light.
I’ll dig out some old prints tomorrow and see what they look like under a direct harsh light source. I say old because as soon as I started modding my printer, the quality went to shit. I may be able to print TPU and ABS now, but it definitely doesn’t look as good as before I started messing with it.
Haha, sounds like fun. This is a Voron 2.4 350, so it has the (dis)advantages of being big/having long belts and having a hot end that’s biased toward speed. I’ve run a spool of TPU through it somewhat recently and at this point I basically daily ASA. PETG parts look better, but I have not tried a PETG cube yet. Maybe I should.
Thanks for digging around for pics! I appreciate the reference.
You sure this isn’t some sort of flow issue? The z-axis should be judged based on measurements of the cube if I’m not mistaken (20mm cube = 20mm) while the look of the print is dependent on speed/flow/layer height/plastic quality. The extrusion looks pretty inconsistent, and I see a ton of ringing even without anything immediately nearby to cause it (you can see it across the entire width below the little slashes from corner to corner).
I dunno what firmware you’re using, but with klipper, resonance compensation and input shaping can help eliminate things like this.
It might be a flow issue. I recently discovered that my hot end was coming apart, which was leading to some print inconsistencies. This is my first print after fixing that, and swapping extruder gears while I was in there. I’ll have to check my belts and take another pass through Ellis’s tuning guide.
I am running klipper, and even have an accelerometer mounted to my tool head, but haven’t taken the time to put some temporary wiring in place to test/tune it. I’ll also have to do that. I do see some fine/faint ringing in the parts.
As for these prints, they were printed fairly quickly on a 0.4mm nozzle with 0.2mm layer height in Polymaker ASA.
Extrusion variance and bad tolerance filament will also exhibit the exact same looking issues, not just poor Z alignment.
Just to be sure, you have z-hop disabled? That can cause all kinds of issues if the gantry isn’t absolutely perfect.
Another thing would be making sure all variable line width printing options are disabled, I.e ones that try to fill gaps with thicker lines or print thinner lines faster to stretch the filament.
And finally, melt temperature oscillations, making sure every feature - outer/inner walls and infill - are printed at the exact same, slower, speed.As for actual z issues, if the bed/gantry isn’t freely moving and has even a slight bind on the screws/axis, it can miss microsteps. One rather harsh troubleshooting tip is to reduce z-microstepping to a lower value, as that gives it more torque per step and usually you do not need the z to move anywhere near as gradually as some microstepping setups theoretically might allow.
Extrusion variance is one of the reasons why I was focusing on my extruder. I’ll have to try a different brand of filament though. I’ve been printing more or less exclusively in Pokymaker ASA. It’s cheap, and prints well enough, but I can’t find tolerance info on it.
Z-hop is not disabled, I’ll have to give that a shot. This is a Voron 2.4, which has geared and belted Z. I’ll have to do the math to see what the actual resolution per full step is later tonight.
I’ve given the gantry a once over twice now and everything seems square/right and moves freely.
Right now I’m thinking my order of attack will be:
- Try a print in atomic filament PETG since I trust the quality of that filament to reduce one variable
- Check belt tension all around
- Run through Ellis’s tuning guide
- Input shaper
- Print a cube in vase mode (I have a bunch)
- Disable thin walls
- Disable z-hop
- Reduce (or eliminate) micro steps
- Slow down velocity and reduce accelerations
Also check if you have TMC drivers and if they have Stealthchop enabled, it can cause these types of issues. Especially for the extruder motor.
They’re TMC2209 drivers. Looking through my printer.config, I think stealthchop is disabled on all my motors. They each have this entry:
stealthchop_threshold: 0
Are you sure you are looking at the right things to improve? Did you check all the screws on the gantry and toolhead? Is your tap (if you use it) solid?
Not at all, that’s part of the reason for this post. I did give all the screws a once over and everything is nice and tight. The tool head was completely rebuilt between the first and second cubes. I’m on team kicky and it’s been pretty reliable/repeatable.
Does your x-axis have any play at all? Try to pull forward/backward on your (cold!!) nozzle lightly and see if it moves, it should not.
It did somewhere along the lines due to my hot end shaking itself apart, but I fixed that before attempting the cube on the left. There’s maybe a small reduction in ringing, but homing is a whole lot more consistent now.
deleted by creator
What do you mean with fixed? Did you replace the rail?
It was truly the hot end. The hot part of the hot end was starting to fall off the heat break due to the three screws that held them together loosening. Fixing involved disassembly, some clean up, and reassembly.
That sure does look blingy!
Nothing in that picture looks accurate
What do you mean? The quality of the cubes themselves or the surface finish? There is a bit of skin defect going on and it looks like OrcaSlicer introduced some corner rounding about 1/3 of the way up the blue cube. I still need to run input shaper, but the prints don’t seem that bad? Maybe my standards are low s because of the absolutely appalling quality of my old I3 clone.
This is also intentionally pretty harsh lighting. I just added the OP to add a photo with more diffuse lighting and all three prints look way more like what you’ll find on the web.
The inserts are poorly inserted and into oblongated & incorrect ID (too big) holes, and the print quality looks poor (just low quality printer likely). Doubt those shafts are perpendicular or located accurately. But I’m not looking at this from a hobbyist perspective, but from a mechanical engineer, machine designer perspective.
Cheap printers are a waste of time IMO, but a good engineering learning experience
Thank you for the more detailed reply. The part in question is is a Voron Design Cube. I printed it on my 350mm Voron 2.4. The print does match the source STL fairly well, but it does look like OrcaSlicer’s result (blue) has more corner rounding than the SuperSlicer results. There’s a 45 degree chamfer on both the lower and upper face of the Z, which might contribute to what you’re seeing. The parts themselves are also physically not that large, so you might be seeing a bit of the impact of the nozzle being round too.
Here is an alternative Piped link(s):
the BMG gears can still be somewhat offset
Piped is a privacy-respecting open-source alternative frontend to YouTube.
I’m open-source; check me out at GitHub.
New Lemmy Post: Installed some bling chasing better z-axis layer alignment. The new parts do look nice, but at this point I think I’m chasing ghosts (https://lemmy.world/post/13244323)
Tagging: #3dprinting(Replying in the OP of this thread (NOT THIS BOT!) will appear as a comment in the lemmy discussion.)
I am a FOSS bot. Check my README: https://github.com/db0/lemmy-tagginator/blob/main/README.md


